Table of Contents
*This post may contain affiliate links. As an Amazon Associate we earn from qualifying purchases.
When it comes to house trends, you will see styles come and go. One that is currently being added to homes is having faux brick wall. If this is something you find appealing and want to add to your home, then creating a DIY faux brick wall is possible.
The Appeal of a Brick Wall
Brick walls have been incorporated into homes since the 17th century. Back then, this was often how homes were constructed. Brick is great at keeping a space warm as well as protecting occupants from adverse weather conditions. Today, having an exposed brick wall can add something extra to your space.
In many ways, having an exposed brick wall in your home harkens back to traditional construction methods. Of course, with new modern styles you can change how the wall looks to match your décor. If you want a dramatic look, then you might consider having exposed red brick. If you want something more subtle, you can paint the bricks. This will give your space some interesting textures, but the wall won’t be overtly noticeable.
What Is a Faux Brick Wall?
Originally, bricks were used to construct a home because there weren’t many other options available. They are a great material for regulating the temperature inside a home and keeping out the natural elements. They are also fire resistant, so it takes a long time for fire to consume a brick home. If there’s a downside, it’s that they can be incredibly expensive and they are heavy.
As building materials advanced, it was possible to put together a home that was both energy efficient and cost effective. If you wanted to add some traditional features, you would consider adding brick accents to the exterior or interior of your home. Having an entire house made of bricks fell by the wayside.
That’s not to say that they don’t still exist. However a lot of people choose to use different materials that are less expensive to build their homes. They may still want to add a brick feature, and this is where a DIY faux brick wall would come in handy.
As the name implies, a faux brick wall is not a real brick wall. In many cases, adding a real brick wall to the interior of a home would be expensive, and the structure may not be able to support the weight. However, if you want to add the same look that comes with real bricks, faux bricks are the next best option.
When it comes to faux brick, you have a few different options to choose from:
Paneling
Faux brick paneling is created from high-quality polyurethane foam and is cast from real bricks. It has the same look and feel, but it’s lightweight and easy to install. It also comes in a variety of styles and colors, so you are sure to find one that will match your style and décor.
Tiles and Veneers
Tiles and veneers are often created from real brick, but they aren’t full-sized so they don’t come with the added weight. They can be recycled from other buildings and then cut down to a thin size to add to your home.
Depending on the tile or veneer that you get, these bricks may be attached to a sheet that you hang on your wall, much like the paneling, or they may come in individual pieces that you have to affix with mortar. Creating your own DIY faux brick wall with these materials will depend on the type you get and your skill level.
Tile and veneer bricks also come in a variety of colors and styles. Finding one that matches your home isn’t a challenge. However, unlike the panels, these could add weight to your wall, so they may not be the best choice for every project.
Benefits of a Faux Brick Wall
If you’re considering adding a DIY faux brick wall to your home, there are many advantages to this choice. It can add style and texture to your home, as well as give it a traditional feel. When deciding whether or not you should use a faux brick wall, here are some of the things you’ll need to consider:
Cost
As mentioned, real brick can cost a lot of money. You’ll also need a professional to install it for you, which will require you to pay for labor. If you want to add the look and feel of brick but not the hefty bill, then getting a faux brick wall is in your best interest.
Weight
Real bricks weigh a lot. Put up an entire wall and you’re adding more weight to your home. Getting these items to your home could be a challenge, and if they have to be shipped this will add to the expense.
If you don’t want to add any weight to your house, and you don’t want to have to worry about freight costs, then a DIY faux brick wall is the way to go. These are light and can often be found in local retail stores. If they don’t have the color or style you like, you can get one online and pay much less to have it shipped to your home.
Durability
Real bricks are incredibly durable, and they can stand up to a lot of environmental factors. However, they are also susceptible to cracking and chipping. Over time, the mortar between the bricks might age, causing it to crack and fall out. When this happens, your brick wall will look terrible and need to be repaired. You may or may not be able to find the right color of bricks to make this replacement. All of these issues add to the cost of having a real brick wall.
Faux brick walls aren’t as susceptible to damage as real brick walls. You won’t have to worry about the bricks getting damage or anything happening to the mortar in between. If something does happen to the paneling, you may have to replace the entire thing; but this will cost you far less than fixing a real brick wall.
Maintenance
Bricks are messy. They are full of dust and other debris, and the installation process involves using wet mortar that can easily splatter onto other surfaces. Bricks are also porous, so if you don’t seal them after they are installed, they will attract dirt and be impossible to clean.
Faux bricks don’t require as much maintenance to keep them clean. You don’t have to worry about the dust and mortar when they are being installed, and if they get dirty, they are incredibly easy to clean. Often, they’ll only require you wiping them down with a damp cloth. If you prefer your house cleaning to be easy and hassle-free, faux bricks are the way to go.
Options
More often than not, real bricks come in various shades of red. You may be able to find some other colors, but these aren’t common. When it comes to faux bricks, there are many colors and styles to choose from, so you have more options to find the right brick for your home.
While you have the option of painting real brick, this could be a long and complicated process. If you’re looking for something that’s easy and comes ready to place in your home, then faux brick is the way to go.
Places to Put a Brick Wall
When it comes to finding the best place in your home to put up a DIY faux brick wall, there are no rules. You can use them as an accent wall in a living room, as the backsplash in a kitchen, or to create a rustic-looking fireplace. They are an incredibly versatile and stylish element to add to any room in your home.
DIY Faux Brick Wall
Faux Brick Paneling
If you’ve decided that you’re going to add a DIY faux brick wall to your home, you’ve made the right choice. Below are the steps and materials you’ll need to accomplish the task.
Materials
- Faux brick paneling
- Measuring tape
- Table saw
- Adhesive
- Nail gun
- Level
Step 1: Choose and Measure the Wall
Before heading to the store to get the faux brick paneling, you’ll need to decide where you want to put it and take measurements of the wall. This will ensure that you get the right color and the right number of panels. You don’t want to be halfway through your project and have to run to the store to get more.
Step 2: Cut the Panels to Size
Once you have your panels, you’ll need to cut them to size. This is where the table saw will come in handy, but if you don’t have one, you may be able to cut the panels with a hand saw. You’ll want to ensure that the lines you cut are straight so that it hangs properly when placed on the wall.
Depending on where you are placing your brick wall, you might have to use more than one panel. They were created to go together, but you may have to spend some time lining up the bricks to ensure that they match up. You’ll also need to use your level to make sure you are hanging the panels straight on the wall.
Step 3: Cut Holes for the Outlets
If there happens to be outlets on the wall that you are covering with faux brick paneling, it’s easier to cut these out before you put the panel on the wall. This can be accomplished using a utility knife or Dremel tool.
Step 4: Add Glue to the Wall
To ensure that the DIY faux brick wall is secure and won’t slide, you might consider adding glue to keep it in place. Place the glue directly onto the wall and then place the panels over the top. Using a thin layer is beneficial and will keep the glue from dripping onto the floor or squishing out of the side of the panels.
It might be a good idea to do this step in sections. That way, you won’t risk the glue drying out before you have a chance to affix the panels. It will also give you a chance to make sure the lines on the panels are even before they are permanently stuck to the wall.
Step 5: Nail the Panels to the Wall
This step is best accomplished using a nail gun. The nails will help secure your panels to the wall and give it a cleaner look. You might also consider adding screws to secure it in place. When using either nails or screws, you’ll need to make sure that they are going into the studs behind the wall. Otherwise, they may pull right out of the drywall, causing damage in the process.
Step 6: Add Some Texture (Optional)
If you want to add some texture, make your faux bricks look more rustic, or hide the seams, you might consider adding some paint or spackle. Using a spreader, you’ll need to apply the spackle to the entire faux brick wall. This can be messy, so make sure you have drop cloths to cover the floor and use tape to protect the other walls.
Once the area has been covered, you’ll need to let the spackle dry, and then you can add a topcoat of paint. For this step, you can choose to use a clear topcoat or a colored one. The decision will be based on personal preference and how you want it to match with the rest of your décor.
Faux Brick Veneer
If you have decided to go with faux brick veneer, below are the steps you’ll need to install this in your home.
Materials
- Brick veneer
- Spreadable mastic
- Adhesive
- Trowel
- Level
- Marker
Step 1: Prepare the Drywall
Before you add faux brick veneer to your wall, you will need to make sure the drywall is clean. This will ensure that the mastic will stick and your veneer won’t fall off unexpectedly. This can be accomplished with a damp rag. If you find that there is grime or grease on the wall, then using a more heavy-duty cleaner is beneficial.
Step 2: Draw Lines on Your Wall
Using a chalk line or laser level, draw lines on your wall to create a guide of where the veneer should go. These will help you ensure that the veneer is straight when you place it on the wall. How many lines you draw will depend on how much assistance you think you’ll need, but having it spaced as far apart as the size of the veneer can be beneficial and make the process quick and easy.
Step 3: Add a Thin Layer of Mastic to the Wall
Adding a thin layer of mastic to your wall and allowing it to dry will ensure that the bricks have something to grab onto so they don’t slide all over the place. This is an incredibly important step, so don’t skip it!
Step 4: Add Mastic to the Back of the Bricks
When you are ready to place the bricks, you’ll need to add the mastic to the backs. For this, you’ll want to be generous in the amount of mastic that you use. However, you don’t want it so thick that it squishes out the side. Finding the right amount may take a little bit of trial and error, but having a thicker layer is more beneficial and will allow the bricks to stick to the wall.
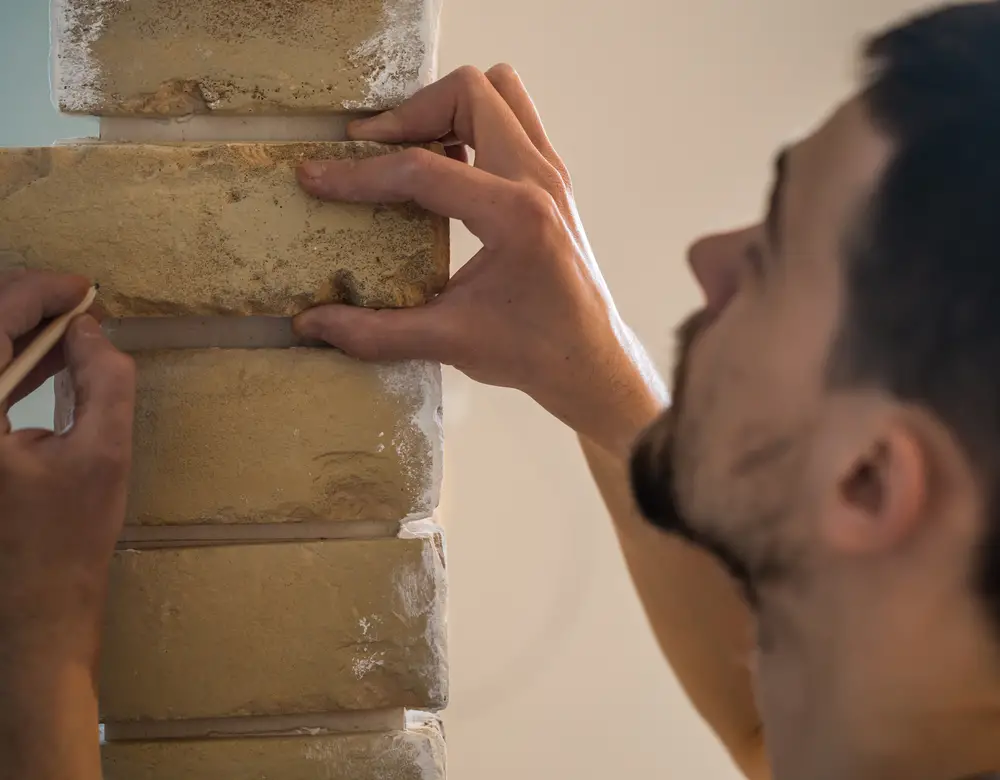
Step 5: Place the Bricks on the Wall
After you have added the mastic, the brick is then ready to stick to the wall. It’s best to start at the bottom and work your way up. Working in small sections can also be advantageous. When it comes to the spacing between the bricks, you can use a tile spacer to make sure the bricks are perfectly spaced.
Step 6: Add Finishing Touches
When using veneer, you may find that areas next to corners and around windows or doors aren’t always covered because of how the bricks are placed. To fill in these spaces, you may find that you have to cut down larger bricks. This can be accomplished using a tile saw, and then they can be affixed to the wall in the same manner as the other items. When cutting, don’t forget to consider the spacing and cut the veneer accordingly.
Conclusion
At one time, brick walls were the style because that was how the home was constructed. As time passed and different materials were used to build homes, bricks were used less often. It’s still possible to find all-brick homes, but more often than not, bricks are used as an accent because of their cost.
If you’re looking for an inexpensive way to add brick to your home, you might consider a DIY faux brick wall. These are often quick and easy to install and will add some texture and tradition to your home.