Table of Contents
*This post may contain affiliate links. As an Amazon Associate we earn from qualifying purchases.
Enter your text here…
There are various ways to wirea switch, but one of the more daunting is 3 way switch wiring. This process,while harder than many basic wirings, is quite manageable to follow or figureout once you understand all of the different steps.
This guide will take an in-depth look into 3 way switch wiringto break down each part of the process and enable you to do your own at-homework in no time.
Why Use 3 Way Switches?
For those new to electrical work, 3-way switches enable lightsto be controlled from different locations. This is a popular method used inmany homes, but older or simpler set-ups still exist.
Many people opt to change out such fixtures or upgrade theirlight switches themselves. While it iseasy to assume that you need a professional for such a project, with thecorrect knowledge anyone can wire a light switch in just a few hours.
Though the process can be more complicated if you have to dodrywall work as well, wiring a light switch without such obstacles is a processthat anyone can handle.
Collecting the Proper Tools/Materials
As with any project, 3 way switch wiring require a set ofspecific tools. It is always important to make note of this beforehand so thatyou don’t get too far into your work and then realize you’re missing a keyinstrument.
Knowing and assembling what you need beforehand not onlysaves you time, it also creates a lot less frustration.
For this wiring style, you want a 4-in-1 screwdriver (themost versatile type), electrical tape, a utility knife, a non-contact voltagetester, a wire stripper/cutter, and needle nose pliers.
You should also gather up (or purchase) a 14-3 or 12-3 cablein addition to 3 way switches.
Safety Always Comes First

Once you have everything ready to go, you can start with thewiring.
Setting up 3 way switch wiring is a process that happens insuccinct steps. As long as you carefully go through each one you’ll be done inno time.
The first thing you must do after assembling your tools isswitch off the circuit. This may seem obvious to some, but for those notfamiliar with wires skipping or forgetting this step can end in disaster.
Electricity is harmful, and you must take the necessarysafety precautions when wiring to ensure that you don’t have an unfortunateaccident.
First, locate your circuit breaker to turn off the switch.Though this is different from home to home, most buildings have the breakers inout-of-the-way places like the garage or basement.
Once you have located the breaker, find the one thatcontrols the lights in the room you’ll be working in and switch it off (justmove the switch over).
From there, you should then take your https://www.homedepot.com/b/Electrical-Electrical-Tools-Electrical-Testers/Voltage-Tester/N-5yc1vZboffZ1z1180x“>voltagetester and double check that there is no power flowing through theroom.
Even if your lights appear to be turned off, this is animportant step that reduces the risk of fire or electrocution.
Get to Know Your Equipment
Next, you want to https://www.thespruce.com/anatomy-of-a-three-way-switch-1152436“>getfamiliar with your 3-way switches. This is a useful step thateveryone, regardless of experience, should do in order to make the installationprocess much easier.
Looking at your switch, you want to correctly identify allof the terminals that you’ll be connecting your wires to.
First, there are the traveler wire terminals. These sit oneach side of the switch towards the top, which makes them easy to identify.
Then there is the ground wire terminal, which sits on thetop or bottom of the switch and is mounted to the frame, and the common wirescrew (located on the left side).
The common wire is easy to identify because it is a differentcolor than both traveler terminals.
Add in Electrical Boxes
Once you understand the switch or switches you plan to use,the next part of the wiring process is to install larger electrical boxes.
While you will already have a switch box in place, odds areit is not going to be big enough for your project. 3 way switches need a lot ofextra wires to work, and that means they need extra room to properly operate.
Trying to cram in all of the additional wires into an oldbox simply won’t work.
Rather, buy larger electrical boxes (which can be found onlineor at your local hardware store) and put them in where the old ones were.
Feeding the Wires Through the Wall
After the boxes are in place and the switches are ready to go,you next need to work the wires through the wall.
First, pick your wire type. You need to either use a 14-3type NM cable, or a 12-3 if you’re connecting to 12-gauge wire. The breakerwill affect this decision as well.
Once you’ve correctly identified your wires, feed the cablesto the light.
If you already have a space for the wires to go you canfollow that path.
However, if you do not have available space, or if yousimply want to loop the wires somewhere else, you can do that by checking forstuds, locating a free space behind the wall, cutting a small hole, and thenslipping the wire through.
Just take note of any obstacles, such as drywall, fire blocks,or insulation, that you may need to overcome. Marking down such items will makeeverything run much more smoothly.
Putting it All Together

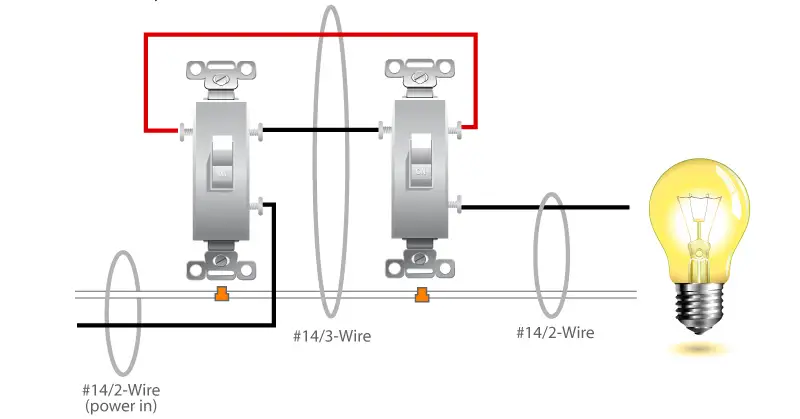
After the wires are where you need them to be, the next stepis to link them up. A 14-3 cable has three insulated conductors that are respectivelywhite, black, and red. It has a bare ground wire as well.
Use ground screws to connect those to their positions on the3 way switch. If you are not familiar with this process, you can consult https://www.do-it-yourself-help.com/3_way_switch_wiring.html“>thesediagrams to get an idea of what finished 3 way switch wiring shouldlook like.
All of the switches are identified by a label on the commonterminal. The terminal screw will also likely be a different color.
During this process, it is also important that you carefullywrap black electrical tape around the ends of white wires used as travelersbetween 3-way switches.
More than One Method

The above steps will cover most of your 3 way switch wiringneeds. However, that is not the only way to convert a single-pole switch to a3-way.
If you want to go another way you can.
To do this, the opening steps (getting ready and assemblingtools) remains the same.
When it comes to the 3 way switch wiring, use a black wirein the top 2-wire conductor to attach the switch to the source.
From there, use pliers to turn the wire into a “J”and carefully wrap it around the black screw on the light switch (typicallylocated at the bottom).
Once the wire is in place, you can carefully tighten the screwdown to hold everything together. Cap the wires connecting the source and theswitch.
Second Black Wire and Capping the Neutral
The second part of this method is to use the existing 2-wireconductor to connect another black wire from the light to the original switchlocation.
Once that’s done, you should cap your different whiteneutral wires.
Put a plastic cap on the end of the white wire from the topconductor at the new switch. Then, cap the neutrals from the power source,light, and other end of the top conductor at the location of the originalswitch.
Travel Wires, Capping, and Switch Boxes
To continue with this conversion method, you next want toattach the traveler terminals on each switch by using the black and whitecables from the bottom conductor.
As with the above processes, take your pliers and carefullybend the wires around each screw.
The final two steps from there are capping the groundingequipment at each switch (and the light) and replacing the switch box covers.
First, locate the grounding screw on each switch, wrap thewires tightly around them, and use your screwdriver to tighten everything down.
You then cap the conductors at each switch box, push thewires into the back of the box, and replace the covers.
Once everything is done and looks the way it should, screw theswitches into the electrical boxes, secure the wall plates, and test your newlights.
New Lights in No Time

3 way switch wiring is an involved process, but it is not asbad as many people make it out to be. Each of the two methods above are morethan doable with the proper planning, and they will give you great results.
Though you may not think you need new light switches, there isnothing wrong with upgrading. Not only will that make your life much easier inthe long run, it truly doesn’t take that much effort.
